The Inverted Aeropress Brew Method
Wondering what is the best way to brew coffee with the AeroPress coffee maker? If you like strong coffee and want to have creativity in your brewing method, then the AeroPress gives you a fun way to do it. There are two methods to brewing coffee with the AeroPress. There is the original standard method and the other is the upside-down inverted method.
Here we are going to focus on the inverted method. There are a ton of research out there on both ways and mostly say there is really no big difference in the way the coffee tastes with the different brew methods. However, the inverted method allows total immersion of the grounds for a lot longer and for as long as you would like (but not too long!). Thus giving you a strong great tasting cup of coffee.
The original method is more of a quick extraction since the brewed coffee is already passing through as soon as water is poured into the AeroPress. If you want to check out the original version, check out my post, “How to Brew Coffee Using an AeroPress”.
I do like my coffee strong and espresso like, so the AeroPress is definitely in my book as one of the best ways to brew coffee. In regards to which of two method is better, that really all depends on your coffee flavor preference or perhaps what mood you are in that moment. Again, there doesn’t seem to be much difference in the two methods. According to the article “The Invention of the AeroPress by Zachary Crockett”, about half used the inverted method in the World AeroPress Champion competition. That is right, there is a championship contest to compete for who can brew the tastiest cup of coffee only using the AeroPress. Pretty amazing! So try it out both ways and see which one speaks to your taste buds the most. Most importantly, have fun and enjoy your fresh cup of coffee with the Aeropress!
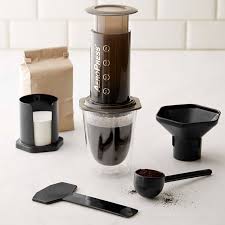
WHAT YOU WILL NEED:
-
WATER
-
COFFEE
-
COFFEE GRINDER
-
KETTLE
-
AEROPRESS
-
AEROPRESS PAPER FILTERS
-
AEROPRESS PADDLE OR SPOON
-
FUNNEL
…
Serving Ratio:
per 12 Oz serving/ 4 tbs or 25-30 grams for a strong brew
Step by Step:
- Heat the water to 200 degrees by bringing it to a boil and letting it sit for 30 seconds.
- Assemble the AeroPress by putting the plunger into the chamber then flipping it upside-down. Do not put the cap or filter on yet.
- Grind the beans to a fine setting (the fresher the grind, the better the flavor). Then pour ground coffee into the chamber. You can use the funnel if pouring straight from the coffee grinder or if you know you might be messy. If you use the funnel, do remove it after pouring in the coffee grounds.
- Pour the heated water slowly into the chamber about halfway and stir with the paddle. Wait 30 seconds. This allows for the coffee to bloom for better flavor. This is an extra step not used in most Aeropress steps, but we like strong and tasty.
- Pour more water slowly into the chamber all the way to the top and stir. Wait 30 seconds.
- Attach the micro-filter inside the cap and place it onto the mug or cup. Then pour a little water to wet the filter to remove off any chemicals in the paper. Pour off the pre-rinse water.
- Place and twist in the lid onto the chamber. Quickly and carefully flip the entire AeroPress over so the cap is down over onto the mug or cup.
- Then firmly and slowly press down on the plunger. While maintaining pressure, press down until you hear a hissing sound. Your coffee is now ready!
- To clean up, remove the cap, hold the Aeropress over the wastebasket and press out the plunger to eject the compressed grounds. Rinse off to clean.