Blog

5 Common Brew Methods to Make Good Coffee at Home

There are many different ways to manually brew a tasty cup of coffee in your own home. However, if you are looking to be more hands on and in control of how your cup of coffee is going to taste, then try one of these 5 common manual brew methods. Be ready to toss out that regular household automatic coffee maker or stick it back in the kitchen cabinet for a busy or lazy day.
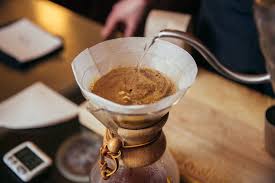
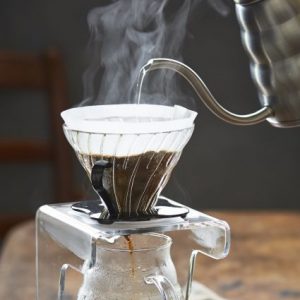
1. POUR OVER method, also known as hand drip coffee, is very simple, but allows your to have complete control of the taste, strength, and water temperature. You just grind fresh coffee and then use a brewing system to pour hot water over the grounds. Basically this consists of ground coffee, filter, filter holder, and a cup of serving vessel. There are no electronic parts to plug anything into and no complicated parts to put together or break. Cleaning is low maintenance and anyone can do it! The two common brewing systems are the Hario V60 and Chemex. They are different in appearance, but similar in the brewing method. They both give you great control over the brew. If you want elegance and the ability to choose many different sizes, go with the Chemex. The Chemex can also make many cups of coffee for more people with just one brew. The Hario V60 is really just a cup or two for just one person, but is easier to clean up and gives you a quicker brew. It is also more portable with the plastic option.
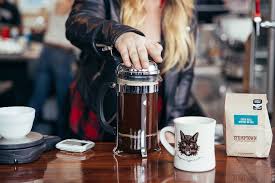
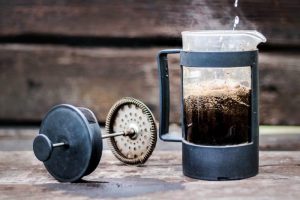
2. FRENCH PRESS, sometimes called a coffee plunger in some parts of the world, is a full immersion brewing device. Simply, it steeps the coffee grounds in hot water and then the grounds are pressed out for a delicious bold cup of coffee. It is affordable and does not require any paper filters as it uses a metal mesh filter. You can control the brew time letting the grounds sit a little longer in the hot water giving you a stronger cup, but not too long as it can become bitter.  It is recommended that grounds be on the coarse side, unless you like your coffee a little muddy. The French Press is simple, saves you counter space, and you can take it anywhere with you. Nothing to plug it into and best of all, you can use it for cold brew or tea.
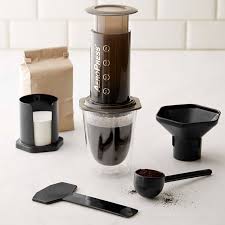
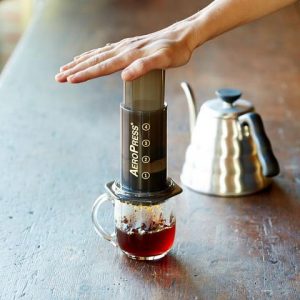
3. AEROPRESS is a plunger and chamber coffee maker that is perfect for the on the go busy coffee enthusiast. There are two ways to brew with the Aeropress. There is the tradition method and there is the inverted way to brew.  The traditional way the water drips through the filter paper immediately when poured over the grounds. With the inverted method, the water stays with the ground until the Aeropress is flipped over. Try out both ways to see how you prefer your coffee! Even though either method only makes a single cup, it can make a more concentrated espresso like coffee. The brew time is super quick with just a minute or two and very easy to clean up. The Aeropress is super portable as it small with only a few parts and can be packed for travel. It does require specific filters and a quick assembly each time you want to drink coffee. Other than that, if you are on the go, this is perfect.
4. MOKA POT, also known as the stove top coffee maker, is the brewing device people prefer and go to for a more espresso like cup of coffee. No electricity is needed for the Moka Pot, but it does require a stove top. How does the magic happen with this type of brew method? Well, the pot is divided into three chambers: one for water, one for grounds, and one for the final product. While on the stove, the water at the bottom of the pot will boil. As the steam pressure pushes the water upward through the coffee ground , the extracted coffee will be sent through the top of the pot. This process is going to take a little getting used to, but worth it for the intensity and strength of the coffee produced. This can portable for the outdoors as long as there is a portable stove top or flame such as a campfire.
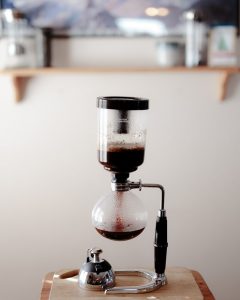
5. SIPHON coffee maker, sometimes called a vacuum pot, may be the most visually interesting of all the brewing methods while producing great tasting coffee. The Siphon has two chambers where the bottom is first filled with water. The bottom chamber is then heated where vapor pressure will force the water to rise into the upper chamber. Coffee grounds is now poured into the top chamber to mix. Next, the heat is turned off and the loss of vapor pressure will cause the water to drop back into the bottom chamber due to gravity and a vacuum effect. With the Siphon you get a full immersion brew for full flavor results. While it is stunning to look at, the Siphon is complex with delicate parts. It is hard to clean, not portable, and brewing time is a little longer than some of the other methods. There are many different kinds of Siphons out there. However, if you want a home version that is a little easier to use, KitchenAid has one available.

How to use a French Press

Quick Steps

  • Heat Water : Fresh off a Boil or 200 F
  • Grind Beans: Coarse, or “French Press” Grind
  • Load French Press: Add Fresh ground beans and Water
  • Agitate: Agitate beans and water using a spoon
  • Brew: Allow mixture to brew for 4:30
  • Press: Press to separate grind from water
  • Serve: Pour off all of the finished coffee brew

Equipment

  • French Press
  • Dangerous Coffee Beans
  • Kettle (goose-neck preferred)
  • Burr Grinder
  • Table Spoon
  • Timer
  • Water
  • Scale ( Not necessary but preferred)

Before you Brew

  • Make sure your French Press is clean. Old Grounds left in the strainer can import bitterness into your fresh batch of super delicious coffee!
  • Starting with Fresh Roasted whole bean Dangerous Coffee will make sure you can capture all of the rich smooth dark roast flavor possible. Keep your whole beans sealed in an air tight container if possible.
  • When you grind your beans all of that terrific smell is your flavor escaping so you want to get water on those grinds a soon as possible.Make sure your water is optimal temp before you grind. That way you can get water on those grinds immediatly!

Serving Ratios

  • 4-Cup Press / Coffee 4 Tbsp or 25 – 30 Grams
  • 8-Cup Press / Coffee 8 Tbsp or  55 – 60 Grams

Step by Step

Step 1

Heat your water to 205 degrees by bringing it to a boil and letting it sit for 30 seconds.

Step 2

Measure and grind your Dangerous Coffee Beans they should end course like bread crumbs.

Step 3

Add fresh ground Dangerous and start your timer. Fill your French Press halfway trying to get all of the grounds wet. The coffee will expand bubble they call it a coffee bloom

Step 4

After the coffee bloom the grinds will float to the top. At about 1 minute break the crust with a spoon or a small wisk and give the grinds a good stir they call agitation

Step 5

Finish filling the French Press all the way up and place the top on it without pressing the plunger down. Allow the coffee to Brew for till the timer hits about 4 minutes 30 seconds.

Step 6

Now it’s time to press your coffee! Slowly and firmly begin to press the plunger down. You are actually trying not to disturb the grinds any further so slow and steady is the method.

Step 7

Time to serve and enjoy your bold and smooth Dangerous Coffee! Pour all of the coffee you plan to drink so you avoid over extraction which will make your coffee bitter and acidic.

How to Use the Fellow Products Duo

Quick Steps

  • Heat Water : Fresh off a Boil or 200 F
  • Grind Beans: Coarse, or “French Press” Grind
  • Load Fellow Products Duo: Add Fresh ground beans and Water
  • Agitate: Agitate beans and water using a spoon
  • Brew: Allow mixture to brew for 4:30
  • Extract: Twist to separate grind from water
  • Serve: Pour off all of the finished coffee brew

Equipment

  • Fellow Products Duo
  • Dangerous Coffee Beans
  • Kettle (goose-neck preferred)
  • Burr Grinder
  • Table Spoon
  • Timer
  • Water
  • Scale ( Not necessary but preferred)

Before you Brew

  • Make sure your Fellow Products Duo is clean. Old Grounds left in the strainer can import bitterness into your fresh batch of super delicious coffee!
  • Starting with Fresh Roasted whole bean Dangerous Coffee will make sure you can capture all of the rich smooth dark roast flavor possible. Keep your whole beans sealed in an air tight container if possible.
  • When you grind your beans all of that terrific smell is your flavor escaping so you want to get water on those grinds a soon as possible.Make sure your water is optimal temp before you grind. That way you can get water on those grinds immediatly!

Serving Ratios

  • 4-Cup Serving Capacity / Coffee 5 Tbsp or 45 – 50 Grams

Duo Parts

Listed from right to left – Duo’s lid – Stainless steel top – Stainless steel brew chamber – etched cone filter – silicine band – borosilicate glass carafe and a protective glass booty.

Assembly

First you have to assemble this coffee steeping beast. Place etched cone filter into the chamber. The filters gasket should fit flush and snug in the bottom of the brew chamber.

Now place the brew chamber into Duo. If you look on the side of your brew chamber you will see 3 icons. The middle arrow icon is what you are going to use for proper alignment. Line up the arrows to the tops spout and slide the chamber down.

Once that is done twist the brew chamber clockwise to seal the top chamber. The sealed icon will align with the center of the spout. Ensure the gasket is placed on the bottom of the brew chamber so it meets the top of the plastic threading

The last step is to attach the brew chamber top to the glass carafe base. Place the silicon band onto the top of the carafe and fold over like so.

Now screw the Duo stainless steel brew complete brew chamber onto the top of the glass carafe. Make sure it is aligned squarely so you get a straight alignment and the threads screw smoothly to ensure a snug seal.

Alright it’s Brew Time

Let’s get your water heated first once the water is heated then you will grind your beans course like a french press or breadcrumbs.

Once you have your grind done load your fresh Dangerous into the brew chamber. You will see your beans expand and release the carbon dioxide trapped in the bean from roasting. This is called a coffee blossom. It’s the Hallmark of a fresh roast!. let the blossom finish and then give a little stir using a spoon.

Place the top on that bad boy and let your coffee brew for 4 to 5 Minutes. When the time is up simply twist the top of the Duo counterclockwise in order to release the coffee brew into the glass carafe. the process should only take 30 to 45 seconds

Enjoy your strong tasty and smooth brew!

No need to fiddle with dirty filters or grind just put your mugs out and pour

How to Make a Chemex Pour Over Coffee

Chemex is one of my favorite ways to brew Dangerous. A pour over in essence is coffee brewing in it’s rawest most primal form and Chemex captures that in one free flowing single apparatus. The design was inspired by the Bauhaus art movement and designed by Peter Schlumbohm in 1941. Critics of the day dubbed his designs a “a synthesis of logic and madness”. Crazy like a fox I say!

Quick Steps

  • Heat Water : Fresh off a Boil or 200 F
  • Grind Beans: Medium to Fine, slightly more coarse than sea salt
  • Load Chemex Pour Over Coffee Maker : Place filter, load grind, our water over grind slowly and evenly
  • Agitate: Agitate beans and water using a spoon or mini whisk
  • Brew: Allow mixture to brew and drain
  • Serve: Remove filter serve coffee brew

Equipment

  • Chemex Pour Over Coffee Maker
  • Dangerous Coffee Beans
  • Kettle (goose-neck preferred)
  • Burr Grinder
  • Table Spoon or small whisk
  • Water
  • Scale ( Not necessary but preferred)

Before you Brew

  • Starting with Fresh Roasted whole bean Dangerous Coffee will make sure you can capture all of the rich smooth dark roast flavor possible. Keep your whole beans sealed in an air tight container if possible.
  • When you grind your beans all of that terrific smell is your flavor escaping so you want to get water on those grinds a soon as possible.Make sure your water is optimal temp before you grind. That way you can get water on those grinds immediatly!

Serving Ratios

  • 12 oz Serving / Coffee 4 Tbsp or 25 – 30 Grams for a strong brew

Step 1

Heat your water to 205 degrees by bringing it to a boil and letting it sit for 30 seconds.

Step 2

Load your Chemex coffee filter and pour some water into it. The idea is to wet the filter so that you remove any linger chemicals in the paper. Then pour off the water. Honestly in my opinion with most premium filters you don’t have to do this because the chemicals have been removed but but if you want an extra step go ahead. If I don’t include this in my blog the coffee snobs will show up at my door with pitch forks.

Step 3

Place Chemex on your scale then measure and grind your Dangerous Coffee Beans medium to fine grind like sea salt. Load your fresh ground Dangerous and start your pour over. Starting in the center of the grind gently pour twice the amount of water that you have in grinds. You can eye ball it try to get all the grinds saturated using your water stream. The coffee will expand and bubble they call it a coffee bloom. I like to use the whisk here to agitate the grinds and get a super solid CO2 extraction. Allow about 30-45 seconds for the bloom to finish. The theory is that when you allow the CO2 to escape first then your grinds are primed for a swift and solid extraction.

Step 4

After the coffee bloom finishes it is time to finish your pour, Continue to saturate the beans starting in the center and working your way outwards in a circular pattern continuing to try to saturate the grinds evenly as possible. Watch the scale because you are going to stop once you have reached about 500 grams. Once you have reached the target stop and give it another whisk. Agitation during a pour over brew is also  another form of classical pour over heresy but F it we live Dangerous I like the extraction it creates.

Step 5

Your done with the work now! Watch the pour over do it’s magic extraction of your delicious strong and super smooth coffee brew. It should only take a few minutes. The nice thing about a pour over is once you get the brew going there is no worry of over extraction you just set and forget. Once the drips stop pull the filter and toss it you are now ready to serve.

Meet the Stagg Pour-Over System by Fellow Products

Fellow Products continues the tradition of refinement and innovation in design with the Stagg Pour-Over System

The Pour -Over Method of coffee brewing is one of the oldest most simplistic methods of coffee brewing in the world. The industry experts consensus start of pour over coffee seems to originate in the story of Amalie Auguste Melitta Bentz. If you recognize the name you should because she founded the Melitta Coffee Company. It was a reaction to the bitter percolator coffee of the day. Percolator coffee is very prone to over extraction and so coffee of the day served using this method was often over bitter and acidic. She loved coffee and felt the flavor profile wasn’t reaching it’s potential so she came up with a more refined process. They say her first paper filter came from her sons ink blotting paper. She noticed the porous and super absorbent properties of the paper, took a brass pot punctured the bottom and constructed her first brew. Viola! The rest is as they say history!

The Kettle

The first thing you will notice is the minimalist Bauhaus inspired design of the Kettle instead of curves it has angles but it’s lines have terrific flow. It comes in three finishes so far polished steel or copper and matte black. It features a counter balanced handle which when you pick the kettle up begs your make your pour.

The Dripper

If your a fan of vacuum sealed hot and cold beverage containers than this may be the pour-over brewer for you! It’s the only double wall vacuum insulated brewer on the market. The brewing chamber enhances the brewing speed by keeping the brew temperature more stable and hotter for longer because it is insulated. The vertical walls and multi drip points give you rapid and even extraction insuring precision accuracy every time. The brewer is designed to flush with the carafe so it presents an elegant marriage of form and function.

The Carafe and Serving Mugs

To finish it off the whole set comes with double wall hand blown borosilicate carafe and 10oz serving mugs

The Inverted Aeropress Brew Method

Wondering what is the best way to brew coffee with the AeroPress coffee maker? If you like strong coffee and want to have creativity in your brewing method, then the AeroPress gives you a fun way to do it. There are two methods to brewing coffee with the AeroPress. There is the original standard method and the other is the upside-down inverted method.

Here we are going to focus on the inverted method. There are a ton of research out there on both ways and mostly say there is really no big difference in the way the coffee tastes with the different brew methods. However, the inverted method allows total immersion of the grounds for a lot longer and for as long as you would like (but not too long!). Thus giving you a strong great tasting cup of coffee.

The original method is more of a quick extraction since the brewed coffee is already passing through as soon as water is poured into the AeroPress. If you want to check out the original version, check out my post, “How to Brew Coffee Using an AeroPress”.

I do like my coffee strong and espresso like, so the AeroPress is definitely in my book as one of the best ways to brew coffee. In regards to which of two method is better, that really all depends on your coffee flavor preference or perhaps what mood you are in that moment. Again, there doesn’t seem to be much difference in the two methods. According to the article “The Invention of the AeroPress by Zachary Crockett”, about half used the inverted method in the World AeroPress Champion competition. That is right, there is a championship contest to compete for who can brew the tastiest cup of coffee only using the AeroPress. Pretty amazing! So try it out both ways and see which one speaks to your taste buds the most. Most importantly, have fun and enjoy your fresh cup of coffee with the Aeropress!


WHAT YOU WILL NEED:

  • WATER

  • COFFEE

  • COFFEE GRINDER

  • KETTLE

  • AEROPRESS

  • AEROPRESS PAPER FILTERS

  • AEROPRESS PADDLE OR SPOON

  • FUNNEL


Serving Ratio:

per 12 Oz serving/ 4 tbs or 25-30 grams for a strong brew

Step by Step:

  1. Heat the water to 200 degrees by bringing it to a boil and letting it sit for 30 seconds.
  2. Assemble the AeroPress by putting the plunger into the chamber then flipping it upside-down. Do not put the cap or filter on yet.
  3. Grind the beans to a fine setting (the fresher the grind, the better the flavor). Then pour ground coffee into the chamber. You can use the funnel if pouring straight from the coffee grinder or if you know you might be messy. If you use the funnel, do remove it after pouring in the coffee grounds.
  4. Pour the heated water slowly into the chamber about halfway and stir with the paddle. Wait 30 seconds. This allows for the coffee to bloom for better flavor. This is an extra step not used in most Aeropress steps, but we like strong and tasty.
  5. Pour more water slowly into the chamber all the way to the top and stir. Wait 30 seconds.
  6. Attach the micro-filter inside the cap and place it onto the mug or cup. Then pour a little water to wet the filter to remove off any chemicals in the paper. Pour off the pre-rinse water.
  7. Place and twist in the lid onto the chamber. Quickly and carefully flip the entire AeroPress over so the cap is down over onto the mug or cup.
  8. Then firmly and slowly press down on the plunger. While maintaining pressure, press down until you hear a hissing sound. Your coffee is now ready!
  9. To clean up, remove the cap, hold the Aeropress over the wastebasket and press out the plunger to eject the compressed grounds. Rinse off to clean.
Scroll to top